NOTE: Use VMWare Player instead of VMWare Server as VMWare Server has been deprecated. Instructions on VMWare Player setup can be found here:
http://www.naumanahmed.com/#!/2012/03/vmware-player-64-bit-installation.html
VMWare Server Setup
This article discusses how to create a SharePoint 2010 development server using VMWare Server Free edition. This is a series of articles that discusses VMWare Setup, Windows 2008 R2 Server Setup, and SharePoint 2010 Server Enterprise Edition setup.
- Part 1 - VMWare Server Setup [Currently Reading]
- Part 2 – Virtual Machine Setup
- Part 3 – Windows 2008 R2 64-bit Standard Edition Setup
- Part 4 – SQL Server 2008 R2 Setup
- Part 5 - SharePoint 2010 Enterprise Edition Setup
REQUIREMENTS
- A machine with 64-bit Intel Processor, at least 4GB of RAM, and 50 GB hard disk space. 64-bit support should be enabled in BIOS of your machine.
- Windows 7 64-bit. However, if you have a 32-bit Windows XP, Vista, or 7 it will still work.
- VMWare Server. You can download it by going to http://www.vmware.com/products/server/overview.html
- Windows 2008 R2 Standard Edition 64-bit Trial. You can download it by going to http://technet.microsoft.com/en-us/evalcenter/dd459137
- SQL Server 2008 R2 Standard Edition 64-bit trial. You can download it by going to http://msdn.microsoft.com/en-us/evalcenter/ff459612.
- Microsoft Office SharePoint Server 2010 Enterprise Edition. You can download it by going to http://sharepoint.microsoft.com/en-us/Pages/Try-It.aspx
VMWare Server is a free edition that you can deploy on your machine. This is a web version of the VMWare software and is little different than the traditional desktop version. We are using it because it is free :)
VMWARE SERVER INSTALLATION STEPS
To instal VMWare Server, follow these instructions.
1. Go to http://www.vmware.com/products/server/overview.html and select "Download".

2. On the next screen, select register by providing your Name and E-Mail address. After you register, the screen will show you your temporary license key. Note down the key as we will need it during the setup.


3. Scroll down on the next screen, select "Start Download Manager".
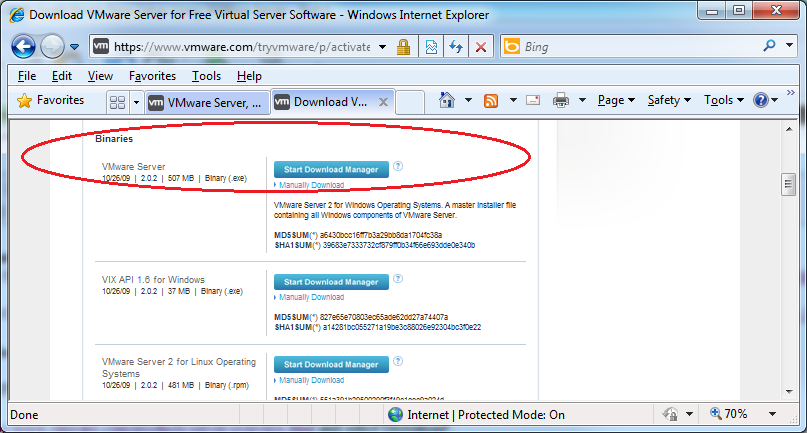
4. On the popup screen, click on the warning and select "Install this Add-on for all Users on this Computer". Select "Yes" if you get Windows User Access Control Prompt. Select "Allow" in the Internet Explorer Security prompt.


5. Select a folder where you want to save the setup file in the next screen and hit "Save".

6. VMWare Download Manager will start downloading the file. Wait until the download is finished. The setup is about 510 MB.

7. When the download is finished, select "Launch". Select "Yes" if Windows User Access Control prompt is displayed.

8. VMWare Server installation wizard will be displayed in the next screen. Select "Next".

9. Accept the license agreement and select Next.

10. Select a destination folder in the next screen and click "Next". If you want to change the location, select "Change..." and select appropriate folder.

11. In the next screen select the following:
Virtual Machine Storage Path: This is where VMWare will store its virtual machines. You can change to a different volume. If you have more than one volume, select the volume that has the most space.
Server Information: This will be your machine name. Leave it as-is.
Server HTTP Port: This is the HTTP port of the VMWare Server web site on your local computer. Leave it as-is.
Server HTTPS Port: This is the secure HTTPS port of the VMWare Server web site on your local computer. Leave it as-is.
Select "Next".
12. In the next screen, leave the default options selected and select "Next".
13. Select "Install" on the next screen to begin the isntallation. Wait until the installation is complete.


14. Select "Finish" to complete the installation.

15. You will be prompted to restart your machine. Save your work and select "Yes".

No comments:
Post a Comment